

How To Change Printer From Offline To Online Windows 10
If y'all have tried to print a certificate in Windows 10, you know that it won't print unless the printer is online. Usually, this only involves turning on your printer and waiting a few seconds for the status to change from offline to online.
Unfortunately, this doesn't happen all the time. Instead, the printer will remain in offline status even though your printer is on and continued to your computer or to the network. There are quite a few reasons why Windows may not detect that the printer is online and I'll do my best to cover equally many solutions as possible.
Step ane: Power Bike Devices
The first affair to do before you get deep into settings and tools is to simply endeavor ability cycling your printer and estimator. A lot of times that fixes the problem. Turn off your printer and turn off your reckoner. And so power on your printer and wait until it is connected to the network. If you're using a USB cable, just wait till the printer is finished starting up.

Now turn on your estimator and run into if the printer is even so showing upward offline or not. Make sure the printer is fully turned off and not but in power saving mode. If you're not sure, the best thing to practice is to unplug the printer completely for about 30 seconds.
Stride 2: Use Printer Software
If your printer is still showing offline, and so you tin can endeavour to use the printer software that came with your printer. These printer utilities can unremarkably detect the printer on the network and gear up any issues that are causing the printer to appear offline.
For example, you lot can cheque out my previous mail service on using HP Impress and Browse Doctor to aid with issues for HP printers. For Canon, go to their back up site, enter your model number and then click on the Software tab. You tin download their My Printer software to manage and maintain your printer.
This pretty much applies to all printer manufacturers. If yous have a Dell printer, go to the Dell drivers and downloads page, search for your printer then download the printer application.
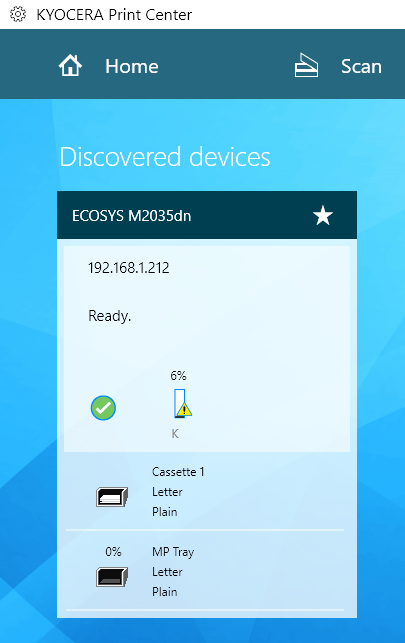
In a higher place is an instance of Kyocera Impress Center software running on my Windows 10 auto. It will show y'all the status of the printer and give you additional details like ink levels, etc. If you lot're not sure whether or not printer software is installed on your machine, you can check by going to Settings, then clicking on Devices and finally clicking on Printers & Scanners.
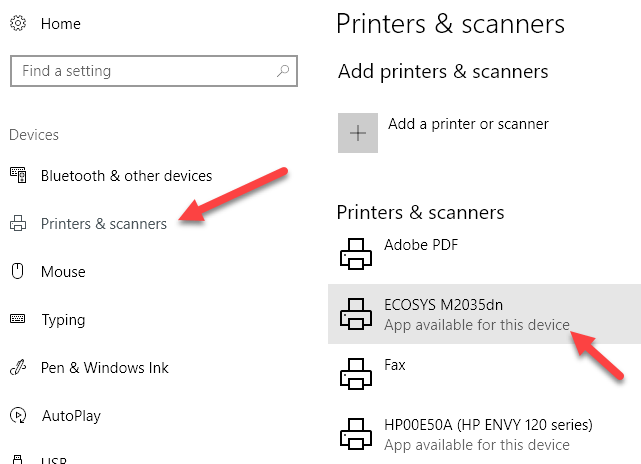
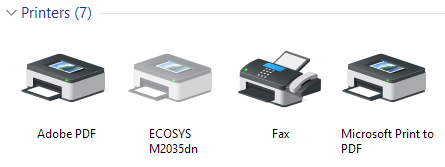
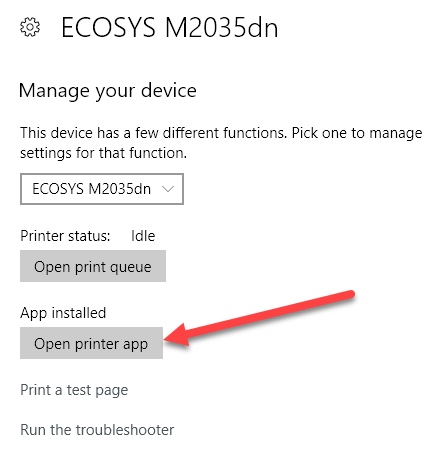
Windows 10 volition listing out the printers on the right-hand side and if there is a software package installed to manage the printer, it will say App available for this device. If you click on the printer, then click on Manage, you'll see an Open printer app button.
In my case, I didn't fifty-fifty know I had the software already installed on my system, and then this was helpful.
Step 3: Set Printer Online
Sometimes, even though the printer is online and connected, the settings are incorrectly configured. Open the printer queue by going to Devices and Printers in Command Panel and double-clicking on the printer.
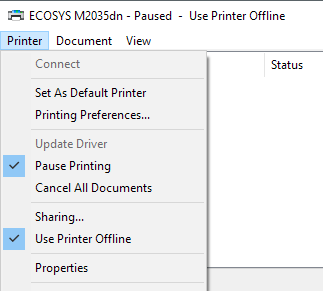
Hither you want to click on Printer in the menu bar and so make certain to uncheck Pause Printing and Use Printer Offline.
Footstep 4: Run the Troubleshooter
If the trouble is with the Windows printing subsystem, then running the troubleshooter might assist. You tin can run the troubleshooter by following the steps in Footstep 2 to get to the Manage your device screen for the printer. One time there, yous'll see the Run the troubleshooter link. Click on that and it will check the spooler service, the network settings, etc.
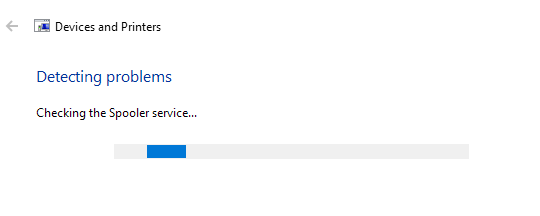
The troubleshooter unremarkably works if the problem is related to Windows.
Pace 5: Check Printer Port
If nothing has worked till now, the trouble is probably related to the port configuration. This will almost likely only apply to a networked printer, which has an IP address. The about likely cause is that the IP accost of the printer has inverse, only the port configuration still points to the old IP accost.
First, find out the IP address for your printer by press out a network configuration page. If yous can't figure out how to do that, and then check out my previous post on how to use some simple and free tools to scan your network and view the IP address of all devices on your network.
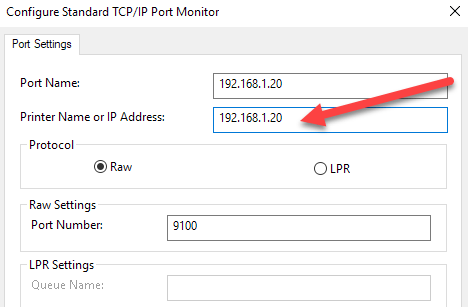
In one case you take the IP address, get to Control Panel, Devices and Printers and right-click on the printer. Make certain to select Printer Properties, not Properties at the bottom.
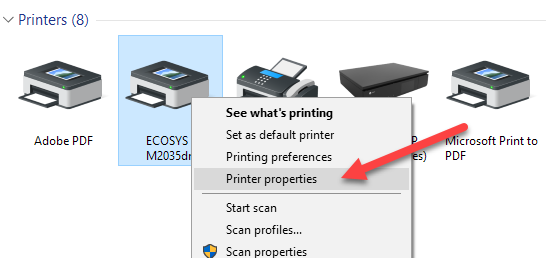
Click on the Ports tab so scroll down the list until you lot see the one port that is checked. Select information technology and then click on Configure Port.
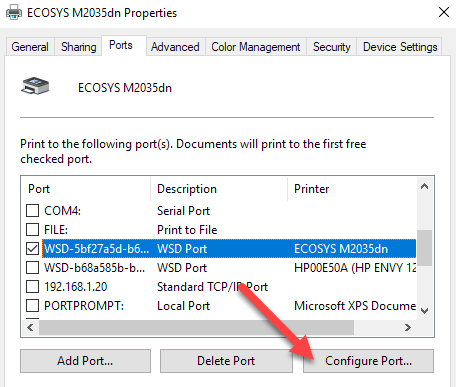
This dialog will tell you lot the current IP accost that information technology thinks the printer has. If the IP accost of the printer is different than the one listed here, then that's your problem. But update the IP address here and yous should be good to go.
If you get any kind of error, similar the one shown below, when trying to configure the port, then it'south probably because it's configured as a WSD port.
An fault occurred during port configuration. This operating is not supported.
A WSD port, which stands for Web Services for Devices, is an automatically configured port that you cannot edit. If this is the example and you can't connect to your printer, you take to add together a new TCP/IP port (via Add Port button). You can read my previous post on adding a network printer by creating a TCP/IP port. Y'all can also read my article on how to troubleshoot wireless printers, which gives some actress tips.
The other less technical option is to follow Step 6, which is to delete the printer and then re-add together it, thereby automatically using the new IP address.
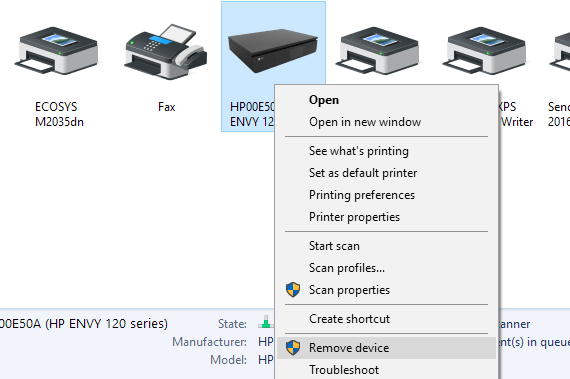
Footstep 6: Remove and Re-Add together Printer
If you can't get the printer working notwithstanding, then your all-time pick might be to remove it and then re-install it. When Windows installs a printer, it will detect information technology, check all the settings, and make sure the driver for the printer is installed properly.
Y'all can remove the printer by going to Control Console, Devices and Printers, correct-clicking on the printer and choosing Remove Device.
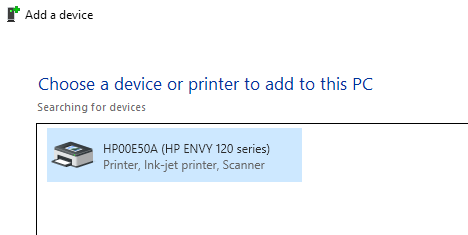
It's also a good thought to restart the estimator once before you reinstall the printer. Note that this will not remove the driver for the printer from your system. If there is some consequence with the driver, follow Footstep vii.
Once you take restarted, click Add Printer and Windows should automatically discover the printer continued locally on connected to your network.
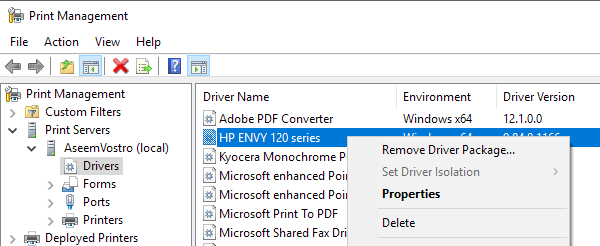
Step seven – Reinstall Printer Commuter
Sometimes the consequence can be associated with the current impress commuter. If this is the case, you should download the latest commuter for your printer from the manufacturer'due south website. Still, before you do that, it'south a skilful idea to remove the electric current impress commuter.
Read my guide on how to remove a printer commuter from Windows. Annotation that the article still applies to Windows 10.
Hopefully, you've been able to impress by at present. If not, I recommend reading my other general guide to troubleshooting printers. In addition to everything to a higher place, information technology's ever a adept thought to install the latest Windows updates every bit those ordinarily incorporate newer print drivers, which could make your printer work amend with Windows 10. If you lot have any questions, mail service a comment. Enjoy!
Practise not share my Personal Information.

Source: https://helpdeskgeek.com/windows-10/troubleshoot-printer-stuck-in-offline-status-in-windows/
Posted by: gasparsible1980.blogspot.com
0 Response to "How To Change Printer From Offline To Online Windows 10"
Post a Comment